Tuesday, October 25, 2016

Gray and Yellow Wedding Quilt

My cousin Doug got married to his beautiful wife Brittany in June and of course, I made them a quilt! Their wedding colors were gray and yellow. At first I had a hard time finding a gray and yellow quilt that didn't read "baby quilt", but finally I found the perfect pattern. Natalia Bonner has a book called "Modern One-Block Quilts" and there is a quilt inside called the "A-Maze Me Quilt". The sample in the book was gray and yellow, so I could perfectly picture what the final result would be!

My next decision was which size pattern to follow. I had a choice between a 66" x 66" (which looked too small) or a 99" x 99". I chose the bigger one, thinking it would look better on their bed. After assembling this quilt top (and sewing non-stop one night from 5:00PM to 2:30AM to finish it in time to drop off to be quilted!) I vowed never to make a quilt that big again! At least not for awhile. Haha. ;) In the end, they were VERY happy with how it turned out. I've included a video at the end that shows the moment I gave it to them. Recording videos of the recipients receiving their quilts is my new favorite thing to do, especially when I can't be with them in person. I love that I get to watch their reactions over and over. They make me smile every time I watch them. Without further ado, here are some pictures of the "A-Maze Me Quilt".
The quilt was too big for my sister and I to hold up without help, so we laid it out on the floor instead.
The next few pictures give you an idea just how big the quilt was. I am 5'1"!
As promised, here is the video of Doug and Brittany receiving their quilt.


Monday, May 30, 2016

New York Beauty Quilt

I'm back with another finished quilt! My cousin Katie got married this past weekend in North Jersey and we had lots of family gathered to celebrate the wedding. I love seeing all of my aunts, uncles, and cousins in the same place at the same time! My parents even flew in from Texas and stayed with us for a week.
 
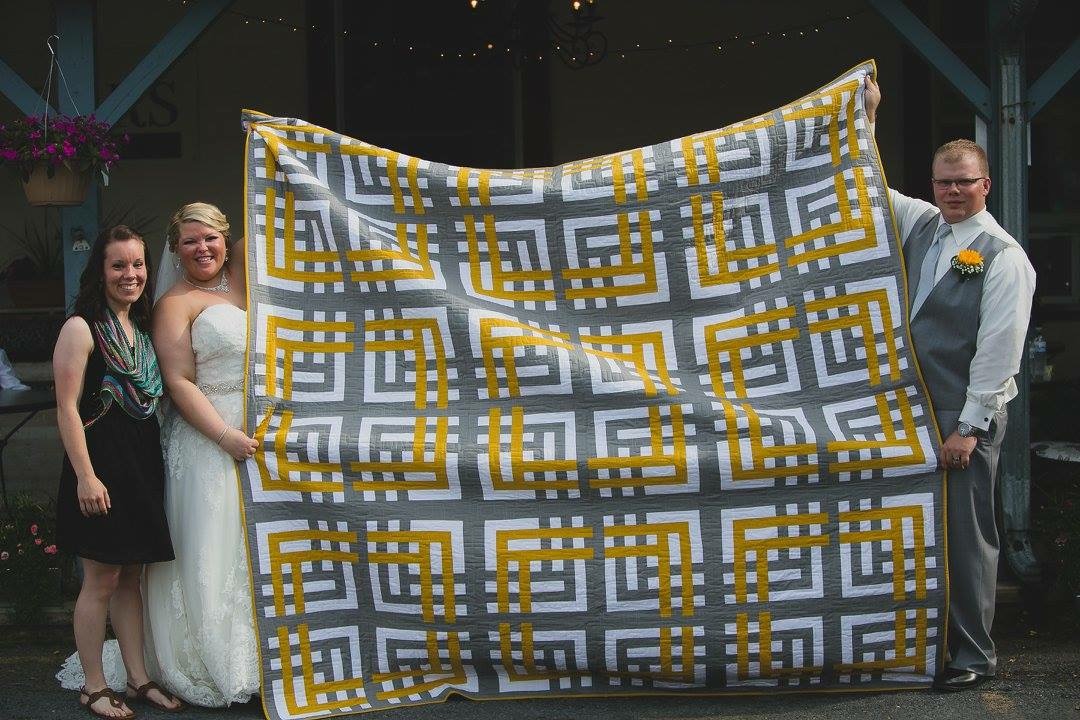
When I asked Katie what colors she and John wanted in their quilt, she said that their wedding colors were going to be black, white, and gold, and that she also wanted "Tiffany blue" as an accent color. I started gathering fabrics before I really knew what I was going to do. Finally, I found the perfect pattern: New York Beauty blocks! Katie and John live in Brooklyn and they love living in the city. I thought these blocks perfectly captured the essence of the New York City skyline. Here are some pictures of the quilt! If you're interested about my process and my thinking behind this quilt, then scroll down and read the rest! :)   
 

I purchased the Desert Sky quilt pattern from Quiltworx and at first I thought I had gotten in over my head. I had done plenty of paper piecing before, but the way those directions were written made it seem REALLY complicated and confusing. I actually avoided starting the quilt for awhile because I was so overwhelmed by the thought of approaching it the way the pattern was telling me to. In the end, I basically ignored the pattern and cut out the templates the way I knew they needed to be cut out. I was able to piece the spikes without any issues and then I used a new technique that I saw in a YouTube video to sew on the curved pieces. The tutorial called for a long pin woven into each end and then glue basting the curve in between with an Elmer's glue stick before sewing. (Here's a link, in case you're interested.) In the end, I'm glad I ignored the pattern. I realize that the Quiltworx technique is taught that way for a reason, and I'm sure it's helpful for some of their more intricate patterns, but I thought it made this pattern way more complicated than it had to be.

I also came to a point where I realized that once the blocks were pieced, this quilt was going to be barely big enough to cover someone's lap. I had to figure out a way to make it bigger without distracting from the center design. In the end, I couldn't find a border design that I liked, so I just drew one myself! I sketched the spikes out on graph paper and then made photocopies at work. I had found a really cool gradient blue fabric, so I cut it into pieces and separated them into nine piles: Light1, Light2, Light3, Medium1, Medium2, etc. Once I pieced the sides of the borders, I had to figure out what to do about the corners. Just like before, I ended up just drawing my own corners on graph paper. At first I start peeling the paper off of all of the border pieces, but once I sewed one side together, I realized that without the paper to hold it stable, there was a lot of extra stretch in the seams and it was actually becoming too long to fit the side of the quilt. Luckily I hadn't gotten carried away and I was able to piece the rest of the border sides together with the paper still on.

After a final, 12-hour(!) day of sewing, I finally had the top and the borders pieced together. I enlisted the help of my husband to peel the paper off the back of the blocks while he watched TV (he was watching "Psych", in case you were wondering). By the time I got it quilted, my parents were in town for the wedding, so I got my Mom to finish stitching the binding for me! I added their names onto the quilt label because it felt wrong not to acknowledge their contributions. ;)

Now I have another quilt to finish by June 11th (I'm halfway done piecing all of the blocks), and a quilt to start and finish by July 23rd. No time for personal projects! I'm on a deadline! Can't wait to share the next few quilts with you! :)

Also, let me know what you think about Quiltworx patterns. I've purchased a bigger one (I think it was the Amazon Star pattern?), and now I'm a little worried about diving into it if the directions are going to be just as confusing.


PS - Here's a video of Katie and John receiving the quilt. I wasn't able to give it to them at the wedding and I also wasn't able to attend the barbecue the next day, but this is almost better because I get to watch this video over and over again! I was smiling like an idiot the whole time I watched this. Haha. ;)

Sunday, April 10, 2016

"The Mysteries of Laura (Diamond)" Quilt

I got to go to my cousin's wedding yesterday AND I got to give them a quilt! My cousin and his new wife are both fans of graphic design and Hannah even does freelance work with her awesome design skills. I wanted to find a quilt pattern that was very bold and geometric. I finally found a cool paper piecing pattern in one of my Fons and Porter magazines. The pattern was called "Emerald Ikat". Here's a picture:
I started buying solid color fabrics at a couple of different quilt stores and eventually started piecing the blocks together. (I also used leftover gray cotton chambray from the soccer/wrestling t-shirt quilt that I recently made.) While I pieced the blocks, I watched the entire first season of "The Mysteries of Laura" on Netflix. That show is so great!! The characters are funny, the plots are not always easy to figure out, and there were over 20 episodes which is always nice. The main character is Detective Laura Diamond and the actress is Debra Messing. I thought it was cool how the blocks began to form diamond shapes, not to mention, Debra Messing tends to wear lots of saturated jewel tones. So the name of this quilt just popped into my head and it was perfect! (I also started watching X-Files next and the gray fabric forms X's, but now I'm probably reading too far into it...) Haha. ;)

Here are some pictures that I got at the wedding site. Big thanks to my Dad for being my quilt holder this time around!
I found this really cool shot cotton that changes from green to red, depending on which way you look at it. I thought that would add a cool touch of dimension to an otherwise all-solids quilt.
I used a solid purple fabric for the back and I love how it shows off the quilting.
As usual, the wind was a factor in this photo shoot. Sorry, Dad! There was even some rain/snow mix coming down and I realized as I was editing these pictures that there's a smudge where a raindrop fell on the lens. Oh well! Nothing I can do about it now.
Here's a nice (slightly blurry) picture of me with my cousin Ben and his wife Hannah. Her dress was BEAUTIFUL!! I want to marry my husband all over again just so I have an excuse to wear that dress. 
Hannah said, "This is the coolest quilt I've seen in a long time!". Mission accomplished. I'm so glad they liked it!
Happy marriage, Ben and Hannah! Can't wait to hang out with you and play some Splendor. :) 
I've got three more wedding quilts to make in the next three months, so stay tuned for more updates! 

Wednesday, March 23, 2016

Giving Is Better Than Receiving

I recently closed down my Etsy shop. After 14 months, I had generated very little traffic and made zero sales, so I decided that I didn't want to bother keeping up with it anymore. Not to mention, if I sold the quilts that I had listed, I didn't really have a plan to replenish the shop with new stock. It's not like I have a lot of time on my hands to churn out sale quilts on the side. ;) (More on that later.) 

After I closed my Etsy shop, I had two lap quilts and two baby quilts to play with. I thought about just using the lap quilts right away (after all, they had been folded in a bag in my sewing room for almost a year and deserved to be used!), but instead I decided that I wanted to give them away. I looked at the Cuzco Crossroads quilt and immediately knew who I wanted to give it to. Our pastor's wife works very hard in the children's ministry and for our church as a whole, not to mention she has her own three kids to take care of and worry about. I wanted to give her something that would let her know that her hard work doesn't go unnoticed or unappreciated. She had mentioned a few times in the past how much she liked my quilts, so it was extremely easy to make the decision to give it away. 
I don't say all of this to brag or make myself look good. I just wanted to share the special moment that I had this weekend that reminded me about the importance of gift-giving, with no strings attached, and the reason why we quilters do what we do in the first place. There's no better feeling than giving someone a piece of your heart that you know they will use and cherish forever. (Wow, that sounded way sappier out loud than it did in my head... you get the idea!).

Right now my attention is focused on finishing four wedding quilts in four months. I can't wait to start sharing my progress here on the blog! I'd like to keep the quilts a surprise until the couple has seen them, so you'll have to wait until April 9th, May 28th, June 11th, and July 23rd to see what I've been working on. 

Thursday, February 25, 2016

Flight Suit Diaper Bag: Round 3 (With Some Minor, Frustrating Mistakes)

I just finished my third flight suit diaper bag! This one is for my friend Stephanie. Her husband is in the same squadron as my husband and they just had their fourth kid, a boy named Griffin! (I say *just* had a kid, but he was born in September, so I feel a little guilty that I didn't finish this bag sooner. Oh well! They'll still get a lot of use out of it.)
She wanted an adjustable, clip-on messenger bag strap, so I used the D-ring hardware from another bag and she can add the strap later when she finds the right one.
She also wanted a pocket with a flap so she could keep her keys or phone in the outside pocket for easy access. I used the same flap installation method as my Noodlehead Cargo Duffle and it turned out great!
The magnet clasp was really strong, so I hope that doesn't make it too difficult to open.
There is a long pocket on the inside front of the bag for a changing pad.
The inside of the bag is lined with iron-on vinyl so it will be easy to wipe out if it gets wet.
Here are some pictures of the changing pad. I used the velcro from the wrists of the uniform for the closure.
If I'm being totally honest, there are some minor mistakes with this bag that I REALLY wish I could fix, but it was too late and I just have to live with them. It's just hard to deal with sometimes because you know your name is attached to this bag and you want it to look good.

The first mistake is here on the edge. When I was stitching the lining to the outside of the bag, I didn't catch the edge of the green fabric and you can see the black foam and the raw edge of the fabric. The topstitching should keep everything in place, but I'm frustrated that I didn't notice this until AFTER I had flipped everything right side out and stitched the lining closed. There's also a little folded over crease in the flap.
The other issue is here where the topstitching kind of got away from me and went crooked. Granted, it's hard to wrestle the bag through the machine when there's so much bulk, but I didn't realize just how far off it got until the bag was done. And again, it was too late to go back and fix it. Those stitches are so close together, it would be nearly impossible to rip them out. 
I realize these are minor mistakes that most people wouldn't notice, but I knew how much Stephanie wanted this bag customized to her needs, and again, it has my name on it, so I really wanted it to look good. As long as it's functional, I guess that's all that matters. I just have to remind myself of what my Dad always says: "Perfect is the enemy of good enough."

Saturday, January 30, 2016

"Be Home Made" Quilt Store Sample

I recently got the opportunity to make a sample quilt for one of my favorite little quilt stores. Home Made is a fabric and yarn shop in Swainton, NJ. Julie has excellent taste when it comes to choosing colors and styling her store. I couldn't wait to finish this project because I loved the fabric so much! Hopefully having this quilt top hanging up in her store will encourage more customers to buy the fabric and the pattern. :)

The fabric is Cloud 9 First Light and the pattern is Urban Log Cabin by Atkinson Designs. This is a GREAT beginner quilt pattern and the large blocks are very forgiving. I finished this quilt top in about six hours.

Here is a link to the fat quarter bundle that is for sale in Julie's shop:
And here is a link to the pattern from Atkinson Design's website:
And here is my finished quilt top!
 And in case you were wondering, the rug is from Target. ;)