I recently closed down my Etsy shop. After 14 months, I had generated very little traffic and made zero sales, so I decided that I didn't want to bother keeping up with it anymore. Not to mention, if I sold the quilts that I had listed, I didn't really have a plan to replenish the shop with new stock. It's not like I have a lot of time on my hands to churn out sale quilts on the side. ;) (More on that later.)
After I closed my Etsy shop, I had two lap quilts and two baby quilts to play with. I thought about just using the lap quilts right away (after all, they had been folded in a bag in my sewing room for almost a year and deserved to be used!), but instead I decided that I wanted to give them away. I looked at the Cuzco Crossroads quilt and immediately knew who I wanted to give it to. Our pastor's wife works very hard in the children's ministry and for our church as a whole, not to mention she has her own three kids to take care of and worry about. I wanted to give her something that would let her know that her hard work doesn't go unnoticed or unappreciated. She had mentioned a few times in the past how much she liked my quilts, so it was extremely easy to make the decision to give it away.
I don't say all of this to brag or make myself look good. I just wanted to share the special moment that I had this weekend that reminded me about the importance of gift-giving, with no strings attached, and the reason why we quilters do what we do in the first place. There's no better feeling than giving someone a piece of your heart that you know they will use and cherish forever. (Wow, that sounded way sappier out loud than it did in my head... you get the idea!).
Right now my attention is focused on finishing four wedding quilts in four months. I can't wait to start sharing my progress here on the blog! I'd like to keep the quilts a surprise until the couple has seen them, so you'll have to wait until April 9th, May 28th, June 11th, and July 23rd to see what I've been working on.
Wednesday, March 23, 2016
Thursday, February 25, 2016
Flight Suit Diaper Bag: Round 3 (With Some Minor, Frustrating Mistakes)
I just finished my third flight suit diaper bag! This one is for my friend Stephanie. Her husband is in the same squadron as my husband and they just had their fourth kid, a boy named Griffin! (I say *just* had a kid, but he was born in September, so I feel a little guilty that I didn't finish this bag sooner. Oh well! They'll still get a lot of use out of it.)
She wanted an adjustable, clip-on messenger bag strap, so I used the D-ring hardware from another bag and she can add the strap later when she finds the right one.
She also wanted a pocket with a flap so she could keep her keys or phone in the outside pocket for easy access. I used the same flap installation method as my Noodlehead Cargo Duffle and it turned out great!
The magnet clasp was really strong, so I hope that doesn't make it too difficult to open.
There is a long pocket on the inside front of the bag for a changing pad.
The inside of the bag is lined with iron-on vinyl so it will be easy to wipe out if it gets wet.
Here are some pictures of the changing pad. I used the velcro from the wrists of the uniform for the closure.
If I'm being totally honest, there are some minor mistakes with this bag that I REALLY wish I could fix, but it was too late and I just have to live with them. It's just hard to deal with sometimes because you know your name is attached to this bag and you want it to look good.
The first mistake is here on the edge. When I was stitching the lining to the outside of the bag, I didn't catch the edge of the green fabric and you can see the black foam and the raw edge of the fabric. The topstitching should keep everything in place, but I'm frustrated that I didn't notice this until AFTER I had flipped everything right side out and stitched the lining closed. There's also a little folded over crease in the flap.
The other issue is here where the topstitching kind of got away from me and went crooked. Granted, it's hard to wrestle the bag through the machine when there's so much bulk, but I didn't realize just how far off it got until the bag was done. And again, it was too late to go back and fix it. Those stitches are so close together, it would be nearly impossible to rip them out.
I realize these are minor mistakes that most people wouldn't notice, but I knew how much Stephanie wanted this bag customized to her needs, and again, it has my name on it, so I really wanted it to look good. As long as it's functional, I guess that's all that matters. I just have to remind myself of what my Dad always says: "Perfect is the enemy of good enough."
Saturday, January 30, 2016
"Be Home Made" Quilt Store Sample
I recently got the opportunity to make a sample quilt for one of my favorite little quilt stores. Home Made is a fabric and yarn shop in Swainton, NJ. Julie has excellent taste when it comes to choosing colors and styling her store. I couldn't wait to finish this project because I loved the fabric so much! Hopefully having this quilt top hanging up in her store will encourage more customers to buy the fabric and the pattern. :)
The fabric is Cloud 9 First Light and the pattern is Urban Log Cabin by Atkinson Designs. This is a GREAT beginner quilt pattern and the large blocks are very forgiving. I finished this quilt top in about six hours.
Here is a link to the fat quarter bundle that is for sale in Julie's shop:
And here is a link to the pattern from Atkinson Design's website:
And here is my finished quilt top!
And in case you were wondering, the rug is from Target. ;)
Monday, December 14, 2015
Soccer/Wrestling T-Shirt Quilt
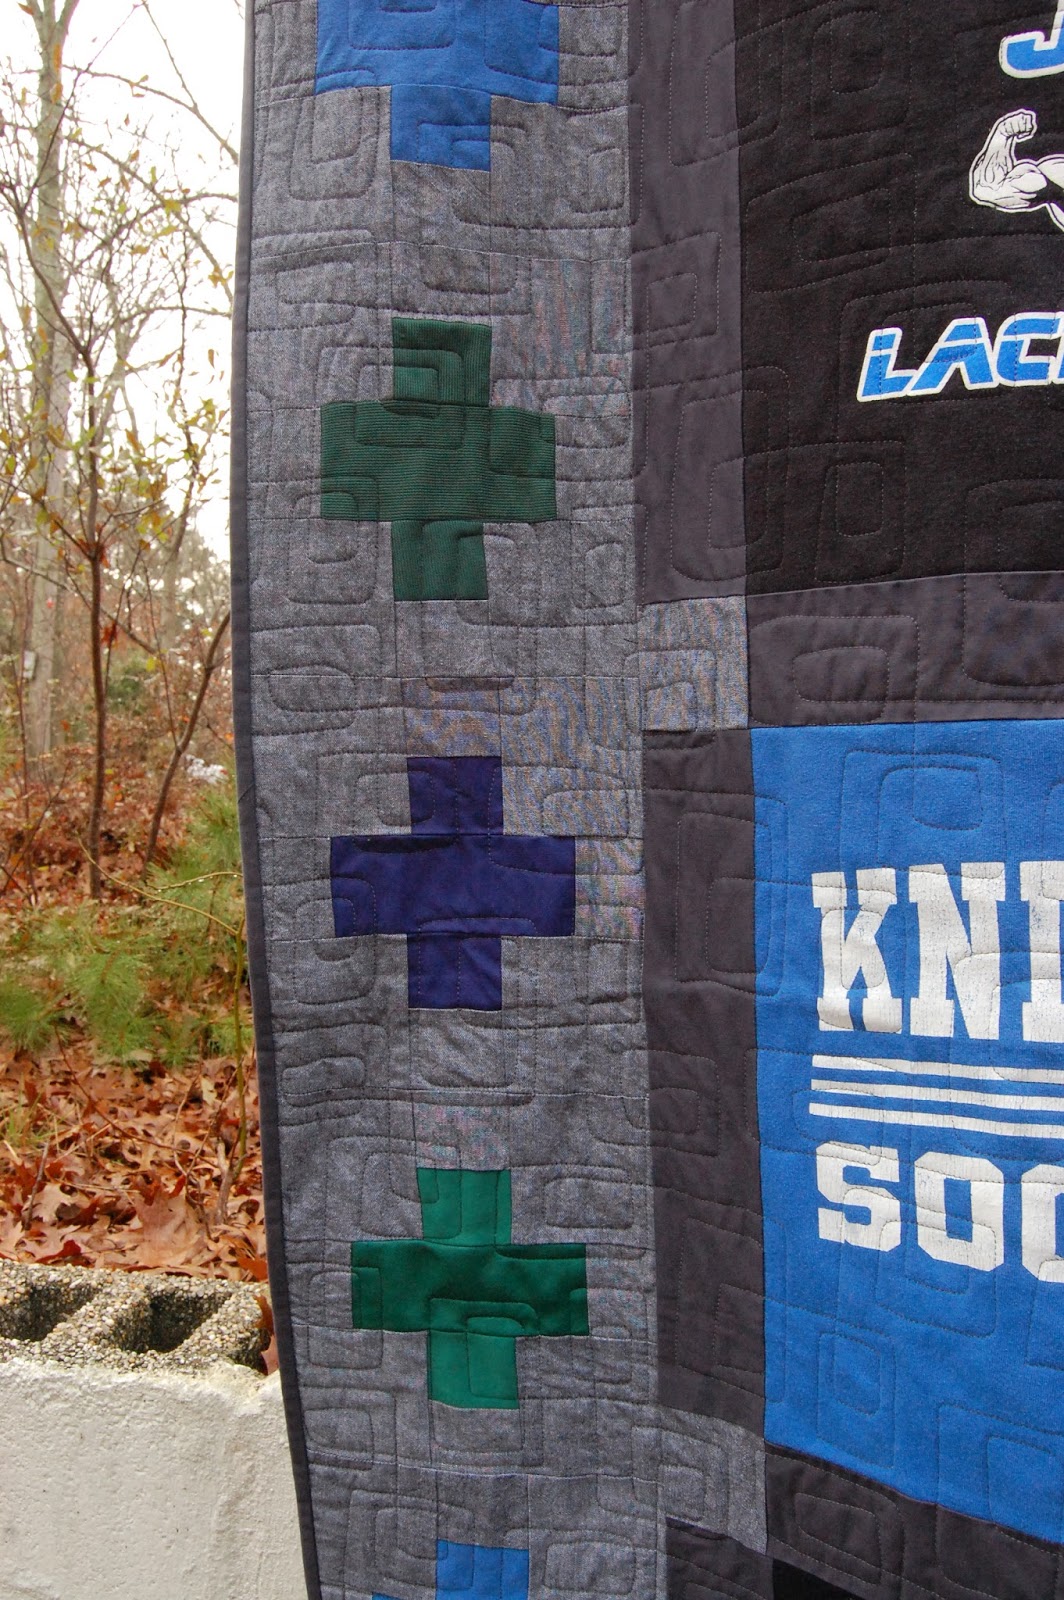
I just finished stitching the binding on this t-shirt quilt and I couldn't be happier with how it turned out! My aunt's friend gave me a bunch of her son's t-shirts and said she trusted me with the layout and the design. I had 16 shirts/squares that I could work with, but I really didn't want to do a big 4 x 4 square layout because I just imagined the (college) kid laying on the couch with his feet sticking out of the bottom. I also didn't love the idea of a 3 x 5 layout because I didn't want it to feel too long and skinny. In the end I decided that I needed the length, so I added some plus blocks on the sides as a border to make it more proportional. I used scraps from the shirts for the plus blocks and I got really lucky when I found a gray cotton chambray in the clothing fabrics section of JoAnn's for the keystones and the background of the plus blocks. It matched everything perfectly and really pulled it all together. I pre-washed all of the fabrics so nothing would shrink out of proportion when they washed it.
There was one more shirt that got relegated to the back when I decided to use only 15 shirts on the front. It blends in perfectly!
After initially agonizing over this quilt and how to make it "special", I'm really happy with how it turned out. T-shirt quilts are surprisingly quick and easy, considering the blocks are huge (I think mine were 14" finished). I wouldn't mind making a few more in the near future! I hope this quilt gets used and loved and brings back lots of great memories. :)
I love the quilting pattern that I found. I tried really hard to make sure the quilt stayed masculine in every way, so I think the squares really accent the shirts nicely.
The plus blocks on the borders are made from leftover shirt scraps.
Again, I was trying to keep things masculine, so I had a really hard time finding a backing fabric that wasn't too girly. (I don't think I've ever made a quilt for a guy before!) Luckily I found a really cool sweatshirt fleece that was super soft and not too thick. My longarm quilter actually quilted it without batting and it's just as thick and warm as any other quilt I've made.There was one more shirt that got relegated to the back when I decided to use only 15 shirts on the front. It blends in perfectly!
After initially agonizing over this quilt and how to make it "special", I'm really happy with how it turned out. T-shirt quilts are surprisingly quick and easy, considering the blocks are huge (I think mine were 14" finished). I wouldn't mind making a few more in the near future! I hope this quilt gets used and loved and brings back lots of great memories. :)
Friday, December 11, 2015
"Radiant Blues" Police Officer Wedding Quilt
My cousin Chelsea is a police officer in Fort Worth, Texas. She got married on November 8th, so I got to head down to Texas and see my family for the first time in almost a year! I knew I wanted blue to be the main theme of the quilt, so when I found a Moda turnover full of rich blue, turquoise, and gray solids, I knew I had to use it! (A turnover is a layer cake cut in half on the diagonal.) I used two turnovers, so basically one whole layer cake.
The best part about taking the pictures for this quilt is that I gave my husband a break from being my quilt holder and had my brother-in-law do it instead. (Is it wrong of me to admit that I enjoyed seeing him suffer for the sake of my art?) Haha. :)
This is the face of suffering and frustration after I kept telling him, "Hold it up higher! I can still see your head, duck down! Now it's crooked, hold it up straight! Why are your arms shaking? This isn't that hard!" Poor Abe. :)
In his defense, it was really windy. This is me attempting to help.
This picture perfectly sums up our photo shoot and makes me laugh every time I look at it. Abe is looking at my sister (his wife) wondering when this is going to be over, I'm trying to get the quilt to lay flat and look nice for the pictures, and Wes (my husband) is just leaning against the wall, smirking, because this is normally what I put him through and now he gets to enjoy it from a distance.
Again, windy. I can't really complain about the weather though because the day of the wedding was 65 degrees and sunny. Perfect!
We took these pictures at the rehearsal luncheon, which was held at a retirement community. We spent a good deal of time in the courtyard taking pictures, and I can only imagine what the residents were thinking as they heard me calling out directions and laughing maniacally...
I found the backing fabric at JoAnn Fabrics, of all places. It matched the colors on the front perfectly!
I didn't realize until I was editing the pictures that this label is EXTRA crooked. Oh well. I love the binding though! I used the same gradient gray/black fabric that I used for my sister's Black and Gray X-Plus Quilt.
I was telling my sister to get a picture of one of the spots where the points matched perfectly. I used a glue basting method with these triangles and I think it really helped to keep the triangles from stretching out as I was sewing them.
Ta-da!
My sister's photography skills (and camera) are much better than mine. Had to take advantage of it while we were together. :)
I hope you enjoyed looking at this quilt as much as I enjoyed writing about it! I love the final product and how it just radiates light. I wish Chelsea and Jeffrey all the best and can't wait to head back to Texas to see everyone again! I'll leave you with a picture of my family (and yes, my dad is the king of the selfie stick) and my siblings!
Subscribe to:
Posts (Atom)